

FAQ / Help pages - Image Transparency
Are images with transparency supported?
Yes! As of Glitterboo version 1.1, you now have the option to preserve full transparency from uploaded images.
This currently only works for animation downloads at the moment.
If the original file is a .GIF or .PNG, and has fully transparent areas, then these areas will also be transparent in the downloaded animation. Note that transparent areas will appear as black in the main preview window, however you can click on to the animation preview where the transparent area is shown as a checkerboard pattern background:
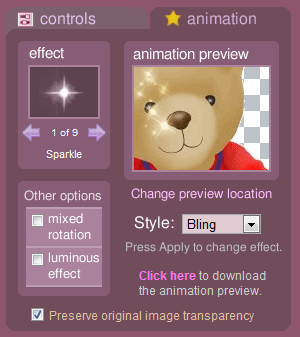
(Teddy Bear clipart courtesy of DailyClipArt.net)
You can also turn off transparency in the downloaded animation by selecting "None" in the "Trans." dropdown box. The transparent areas of the image will then come out as black. If no transparency was detected in the uploaded image, then this dropdown box will not be displayed.
PNG files with alpha channel opacity can also be uploaded, but only the areas in the image that are completely transparent will come out as transparent in the animation (this is because animated .GIF files only support a single level of transparency).
Update: Now in Glitterboo v2.0, the default transparency option is set to "Orig.+new". This means that the original transparency will be preserved, however if you add new effects in the transparent areas (e.g., using the pen selection tool), then the transparency will be altered in order to not cut-off these effects.
You can also change back to the previous behaviour by selecting "Original". This means that only the original image transparency is used, so some effects may get cut off if they are located in or near a transparent part of the image.
If the original file is a .GIF or .PNG, and has fully transparent areas, then these areas will also be transparent in the downloaded animation. Note that transparent areas will appear as black in the main preview window, however you can click on to the animation preview where the transparent area is shown as a checkerboard pattern background:
(Teddy Bear clipart courtesy of DailyClipArt.net)
You can also turn off transparency in the downloaded animation by selecting "None" in the "Trans." dropdown box. The transparent areas of the image will then come out as black. If no transparency was detected in the uploaded image, then this dropdown box will not be displayed.
PNG files with alpha channel opacity can also be uploaded, but only the areas in the image that are completely transparent will come out as transparent in the animation (this is because animated .GIF files only support a single level of transparency).
Update: Now in Glitterboo v2.0, the default transparency option is set to "Orig.+new". This means that the original transparency will be preserved, however if you add new effects in the transparent areas (e.g., using the pen selection tool), then the transparency will be altered in order to not cut-off these effects.
You can also change back to the previous behaviour by selecting "Original". This means that only the original image transparency is used, so some effects may get cut off if they are located in or near a transparent part of the image.
What happens to the background color in transparent images?
New option in version 1.3: You can now select a background color to use when uploading images with transparency
(.GIF or .PNG image formats).
After uploading an image with either transparent or semi-transparent pixels (alpha channel), a background color selection page will appear. You can select what background color to use when dealing with transparency.
This is especially useful when you upload a .PNG file with alpha channel transparency. In this case, some of the pixels are not fully transparent. However, the .GIF animation format only supports full transparency, so we need to decide what to do with the semi-transparent pixels.
By selecting a background color here, you can blend the semi-transparent pixels into the background while also keeping the fully transparent parts of the image.
For best results, select a color that is similar to what the intended background color of you uploaded image was.
If you're not sure what color to choose, just press "Continue" to try the default (black). If you notice jagged pixels around the edge of your downloaded animation, you might want to try choosing a different background color when uploading.
The background color selection also controls the color used for fully transparent areas for static (.JPG) downloads.
The effects are being cut off by the transparent edge of
my animation
When the "Trans." option is set to "Original" (only use the original image transparency), effects very close to the (transparent) edge of an image
may get "cut-off" by the transparency.
You can check for this using the Animation Preview window. If you set the "Trans." option to "Orig.+new" instead, the transparency will be removed in any areas where you add effects (see image above for an example).
You can check for this using the Animation Preview window. If you set the "Trans." option to "Orig.+new" instead, the transparency will be removed in any areas where you add effects (see image above for an example).